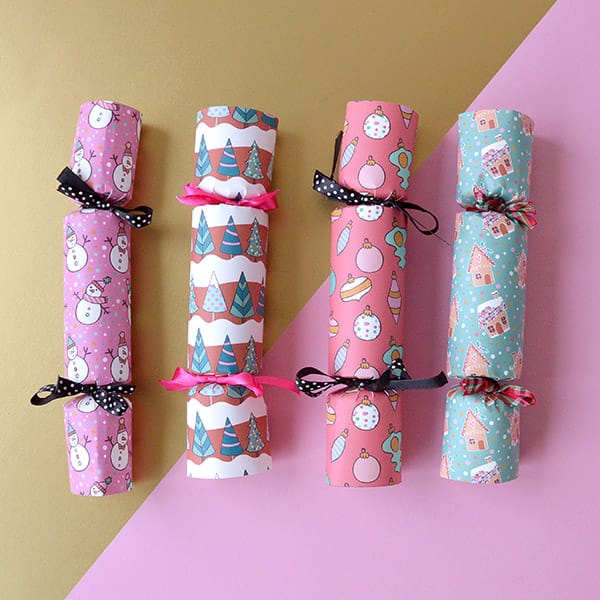
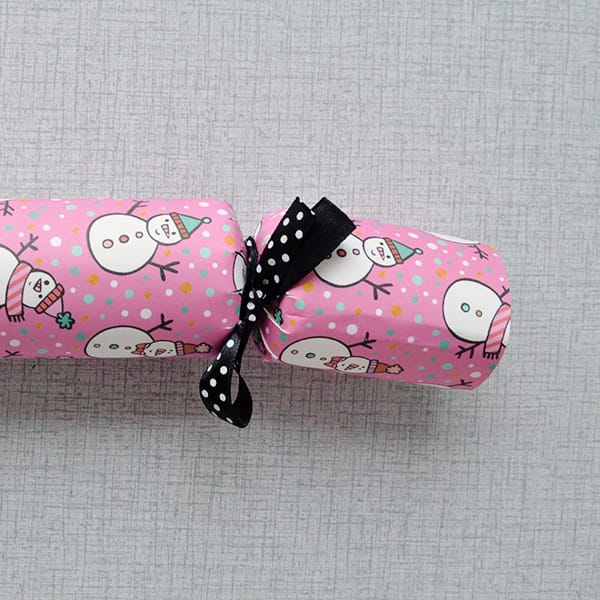
Ik leef momenteel voor kerstdecoratie en de Christmas Cracker is iets dat nooit ontbreekt op mijn kersttafel. De knal, de wijsheden en simpelweg het aanzicht van een mooi aangeklede tafel met Christmas Crackers op de borden: I love it. Al jaren ben ik van plan zelf crackers te maken (je bent maker/illustrator of niet) en dit jaar maakte ik daar eindelijk eens tijd voor. En omdat ik graag dingen deel heb ik vandaag een DIY met gratis printable voor jullie zodat jullie ook lekker aan de slag kunnen met de leukste en origineelste Christmas Crackers (al zeg ik het zelf). En het is niet eens moeilijk!
My life is all about Christmas decorations at the moment and the one thing that I always have on my Christmas dinner-table are Christmas Crackers. I’ve been wanting to make these myself for years, but I never got around to it. This year, I finally made the time to do so and I love sharing this DIY (and free printable!) with you today. Easy? Yes! Festive? Absolutely! The prettiest Crackers one has ever seen? Oh, hell yes! Let’s get started!
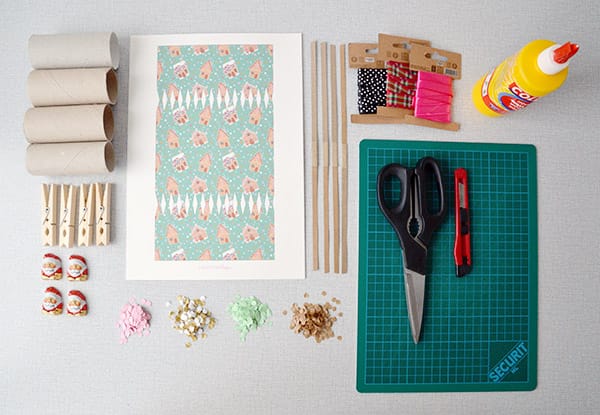
Je hebt nodig (voor minimaal 4 crackers):
✩ lege wc-rollen
✩ de printable
✩ cracker snaps of trekrotjes
✩ lint of touw
✩ lijm
✩ schaar
✩ hobbymesje
✩ snijmat
✩ houten wasknijpers
✩ confetti (optioneel)
✩ kleine cadeautjes of kerstige snoepjes (optioneel)
You’ll need (for at least 4 crackers):
✩ empty toilet paper rolls
✩ the printable
✩ cracker snaps
✩ twine ro ribbon
✩ glue
✩ scissors
✩ hobby knife
✩ cutting mat
✩ wooden clothespins
✩ confetti (optional)
✩ small gifts or christmas-themed candy (optional)
We gaan beginnen!
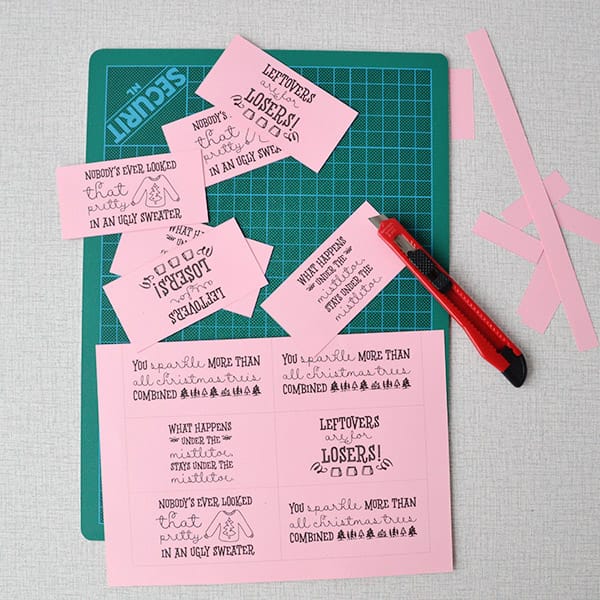
Download de printable en print deze uit. Print de pagina’s met daarop de templates en illustraties bij voorkeur op een wat steviger papiertje. De spreuken kun je op ‘normaal’ printerpapier printen, maar ik koos ervoor ze op een roze papiertje te printen voor extra festiveness.
Let’s get started!
Download the printable and print is. Print the pages with the templates and illustrations preferably on cardstock. You can choose to print the mottos on plain paper, but I chose to print them on a nice pink paper for extra festiveness.

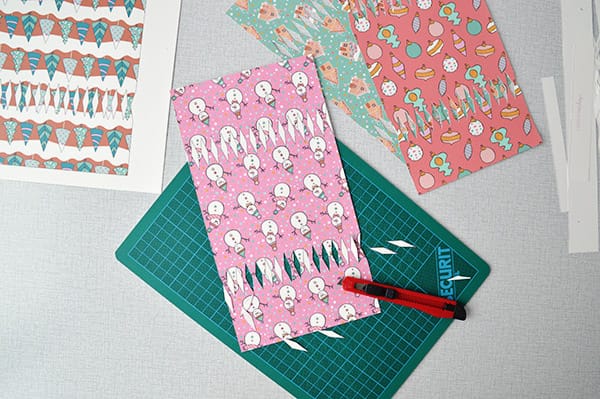
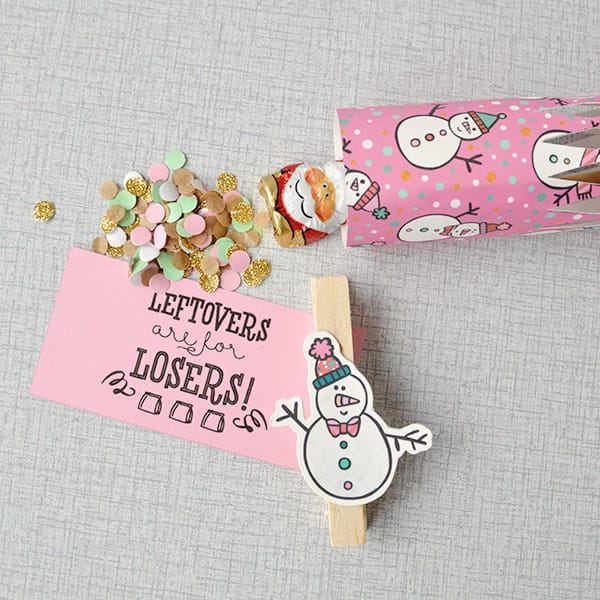
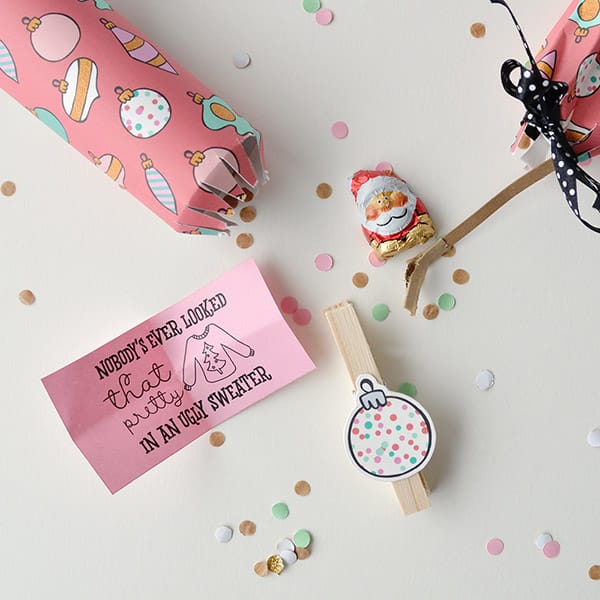
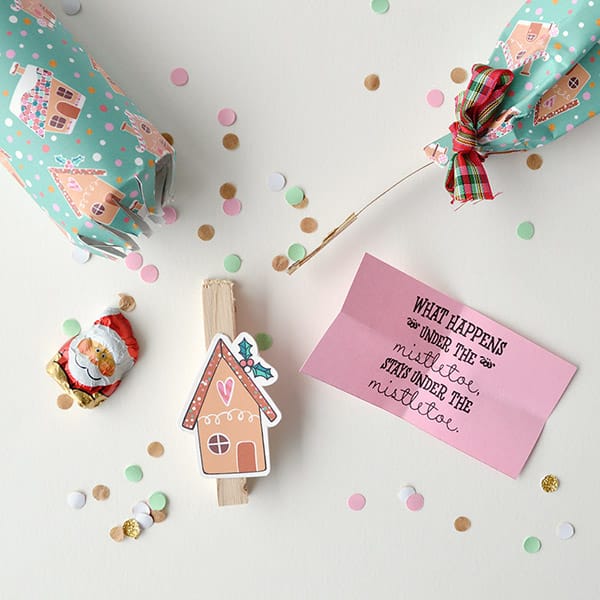
We beginnen met de vulling van de Christmas Cracker. Knip of snijd de spreuken netjes uit en leg ze opzij. Knip of snijd dan de losse illustraties netjes uit langs de grijze stippellijn.
We’re gonna start with the cracker ‘stuffing’. Using scissors or a hobby knife, cut out the mottos along the grey lines and set aside. Then cut out the separate illustrations along the grey dashed lines.
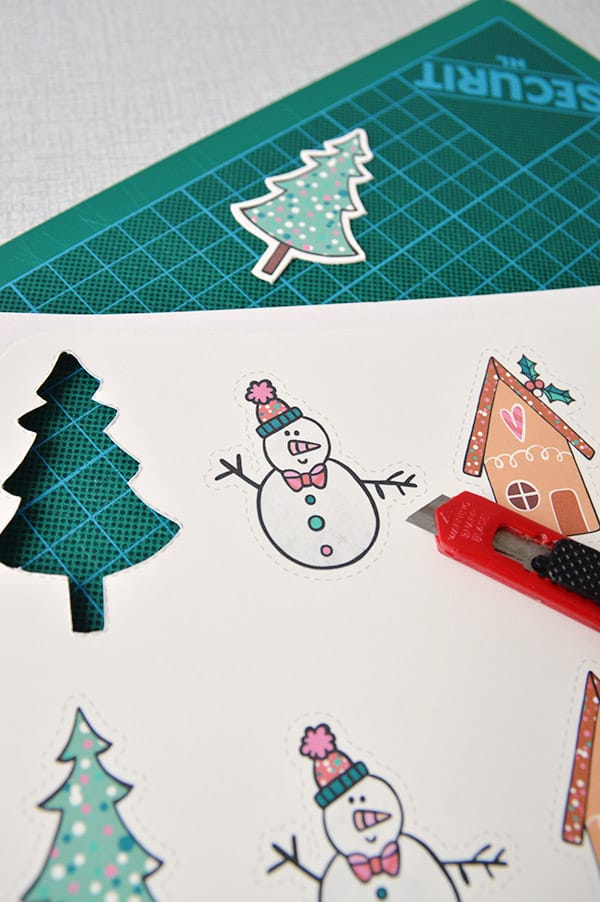
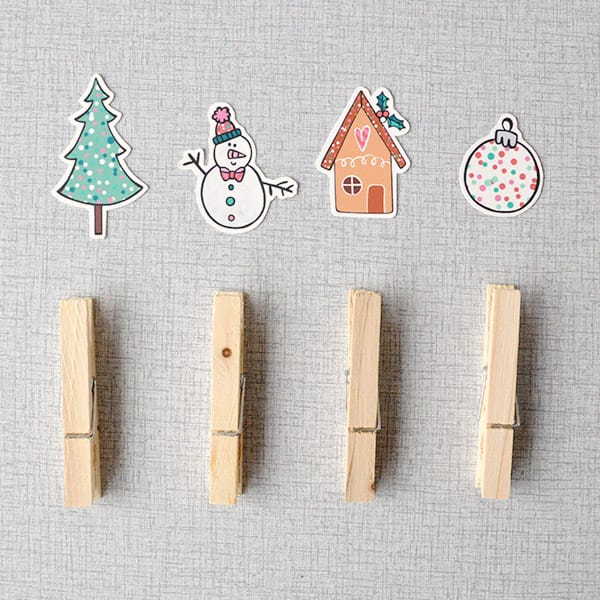
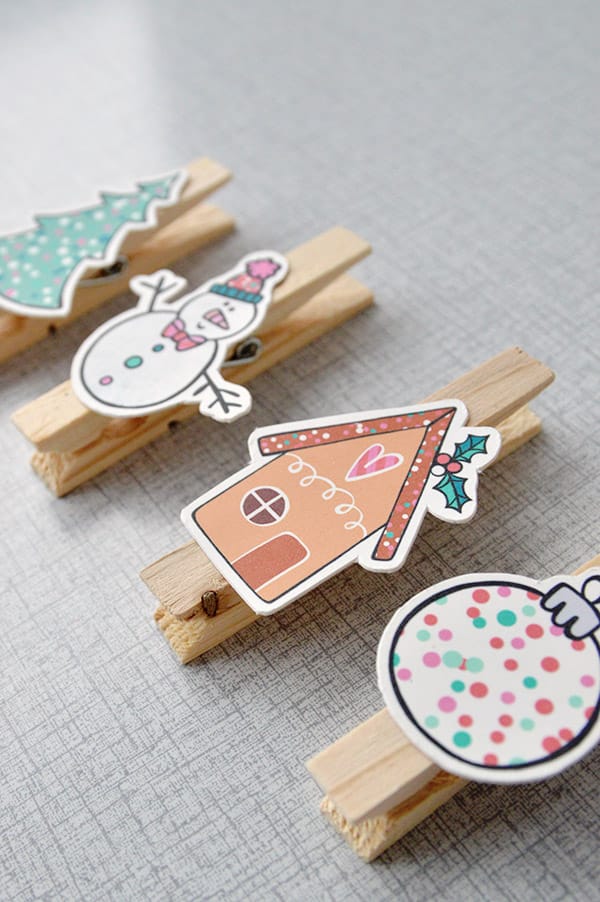
Die uitgesneden illustraties gaan we vervolgens op de wasknijpers plakken. Dit wordt je ‘cadeautje’ voor in de cracker. Je kunt de knijpers straks gebruiken om kerstkaarten of bijvoorbeeld je kerstsokken mee op te hangen. Lijm met een mooi dotje lijm de illustraties op de wasknijpers en leg ze weg om te drogen.
Next we’ll be sticking those cut out illustrations to the clothespins. This will make for a little gift that’s inside the cracker. You can use the clothespins to hang up your Christmas stockings or some Christmas greeting cards you’ve received.
Glue the illustrations to the clothespins and set aside to dry.

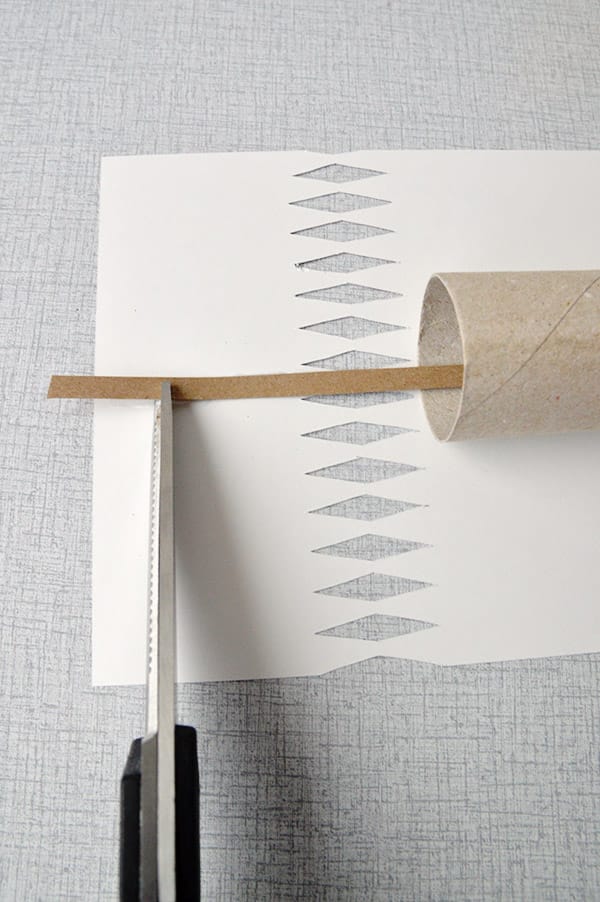
Nu gaan we de cracker zelf maken! Begin met het uitsnijden van de cracker template. Snijd alles wat wit is weg, dus ook de ruitvormige uitsparingen aan de zijkanten.
Now we’ll be making the crackers. Start by cutting out the templates. Cut away everything that is white, including the diamond shaped pieces at the sides of the template.

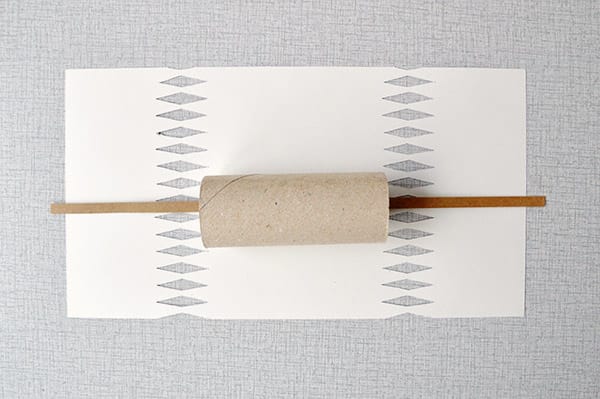
Leg nu je uitgeknipte Cracker template met de mooie kant naar beneden op je werkblad. Leg daar vervolgens een lege wc-rol op en leg door die wc-rol een cracker snap of trekrotje. Ik kocht die cracker snaps trouwens op amazon, maar trekrotjes doen ook prima dienst. Die knallen alleen iets minder hard.
Lay your cut out template blank side up on the table. Put a toilet roll on top if it and put a cracker snap through the toilet paper roll.
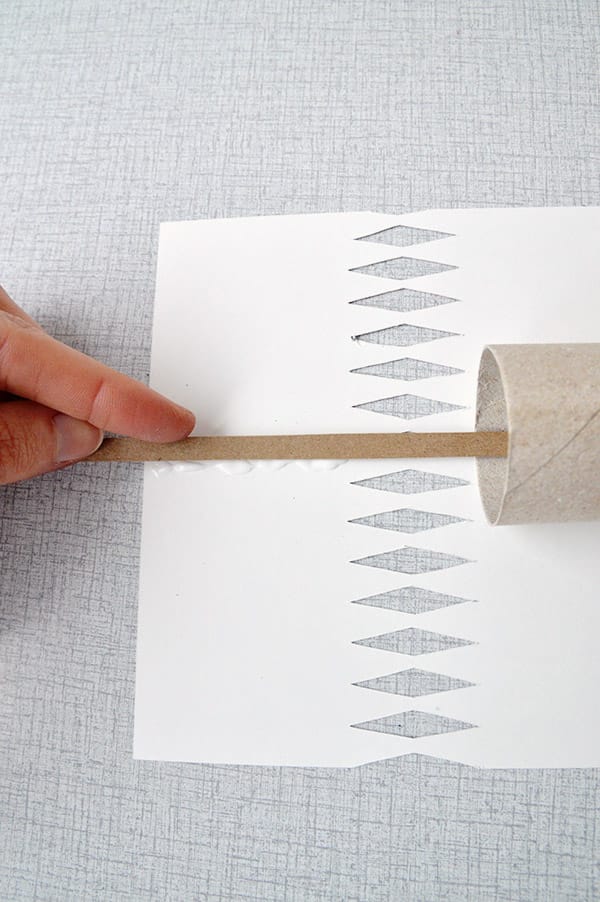
Lijm nu de uiteinden van de cracker snap vast op de template. Dit zorgt ervoor dat je de cracker snap straks ook echt kapot trekt en niet per ongeluk door de cracker heen trekt waardoor hij niet knalt. It’s all in the bang! Wanneer de cracker snap of het touwtje van je trekrotje uit de zijkant van de cracker template steekt kun je die nog even netjes afknippen, dan zie je hem straks niet meer zitten.
Glue the ends of the cracker snap to the template. This a very important step, because it makes sure you will break the snap instead of pulling it through the cracker in one piece. It’s all in the bang peeps! When the cracker snap is a bit too long to fit the template, you can cut away the sides so they won’t be sticking out once the cracker is done.
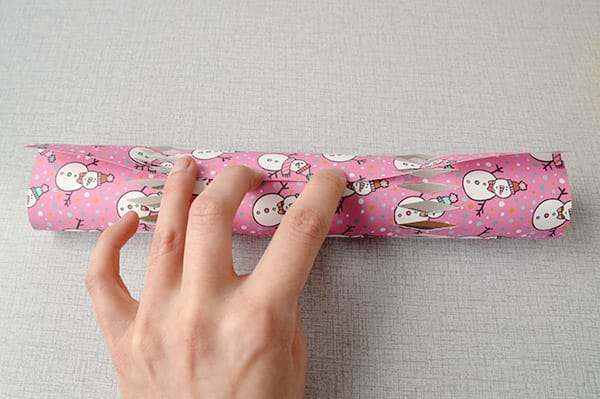
Rol nu je template netjes om de toiletrol en plak hem vast. Dubbelcheck even of je toiletrol netjes in het midden (en dus tussen de uitgesneden ruit-vormpjes) ligt, anders kom je zometeen in de problemen met het dichtmaken van de cracker. Plak ook de zijkantjes netjes vast zodat alles mooi rond is. Laat de lijm even drogen. In de tussentijd kun je de andere crackers in elkaar zetten.
Now you can start rolling your template along the toilet roll. Glue it in place and don’t forget to glue the sides as well, so every part of the cracker is nice and round. Set aside to dry. In the mean time, you can assemble the other crackers.

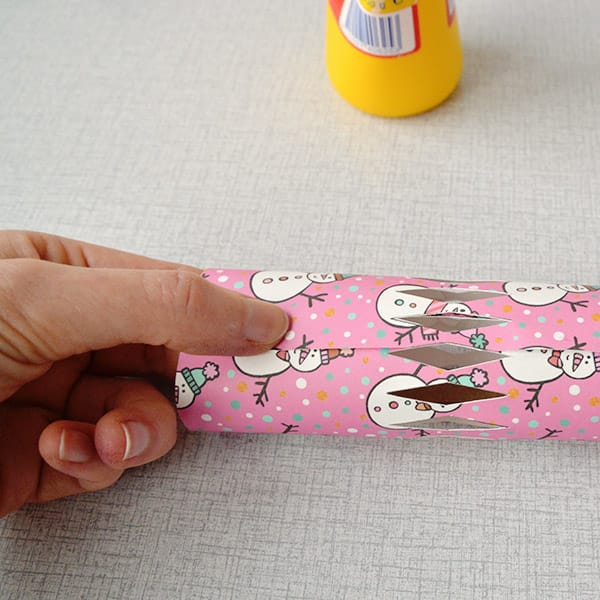
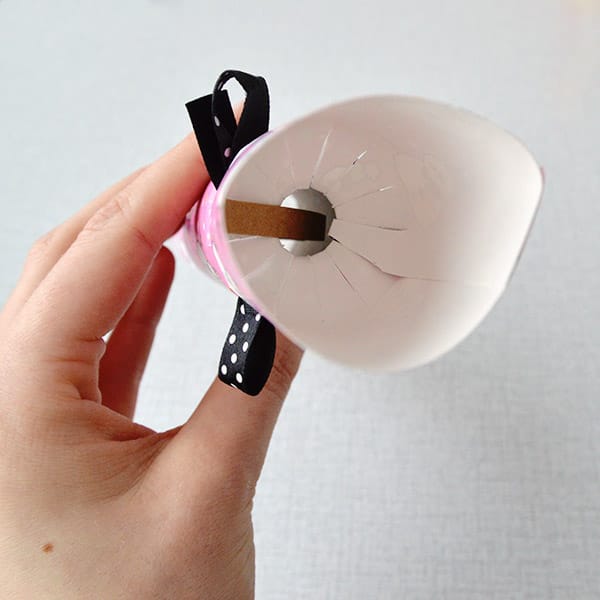
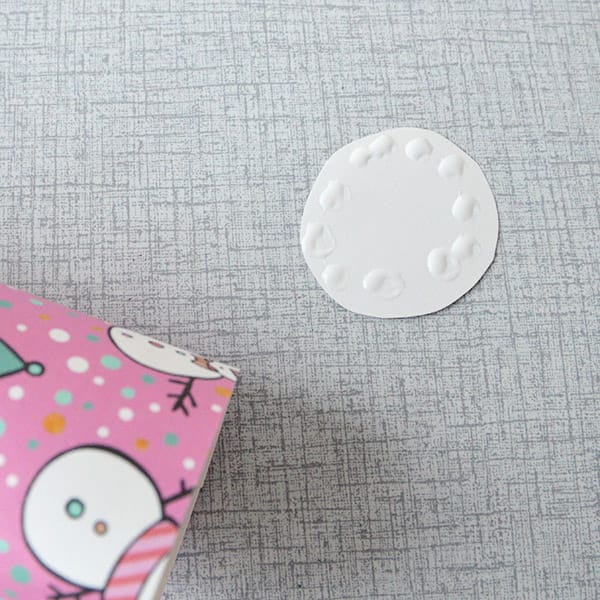
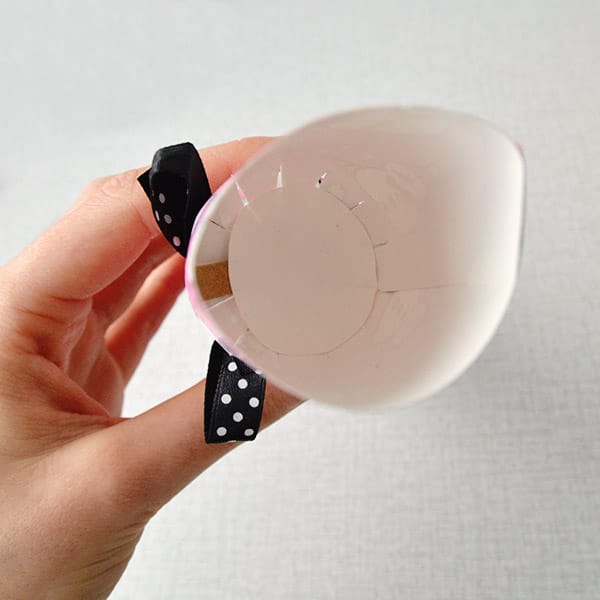
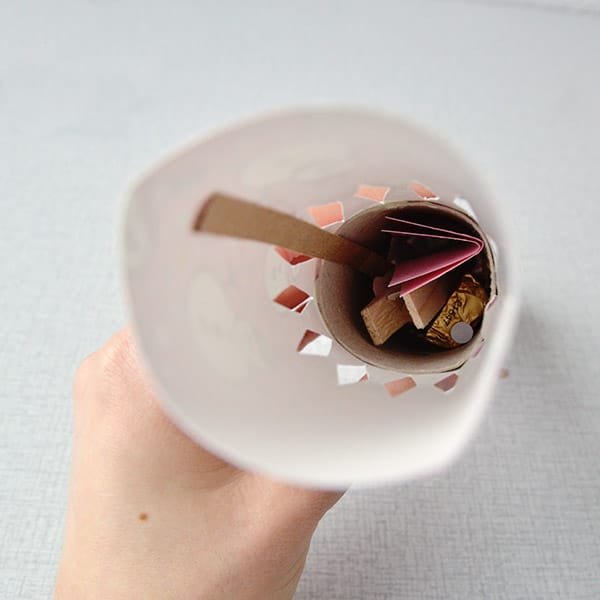
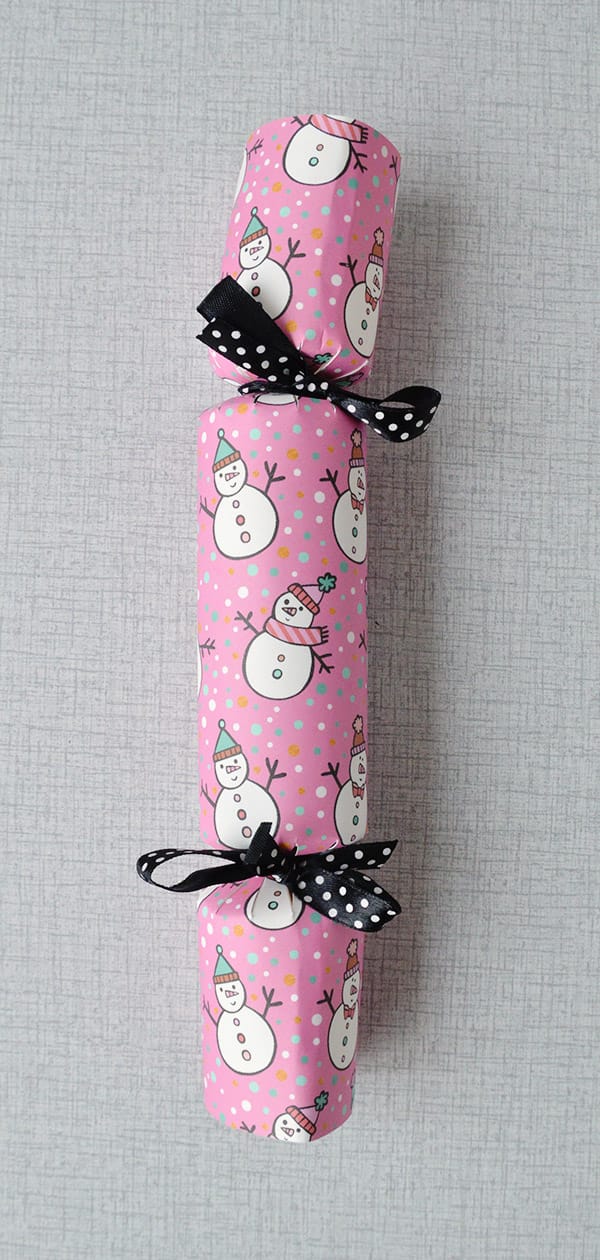
Nu gaan we de cracker aan één kant dichtmaken. Vouw het randje met de uitsparingen netjes naar binnen (dat gaat als het goed is heel makkelijk) en knoop er een touwtje of stukje lint omheen. Doe dit zo strak mogelijk, zodat straks niet de helft van je vulling eruit valt. Heb je je template op dun papier geprint? Let dan op dat je met het touwtje of lintje het papier niet kapot trekt. Wanneer je confetti gebruikt raad ik je aan de cracker op de ‘kopse kant’ nog even dicht te maken met een rondje papier: Knip een rondje uit een stukje restpapier en plak daarmee het gaatje dat over is gebleven bij het dichtmaken dicht. Zo weet je zeker dat er geen confetti uit komt vallen.
Next up: closing one side of the cracker. Fold the side of the template towards the middle so that the diamond shapes bend inward. Then tie a piece of ribbon or twine to close the cracker (be careful not to rip the paper by pulling the ribbon too tightly if you didn’t use cardstock for the printable). If you’re using confetti, you can use a piece of scrap paper to close up the little ‘hole’ in the side of the cracker that’s there because of the cracker snap. This will prevent confetti from falling out.
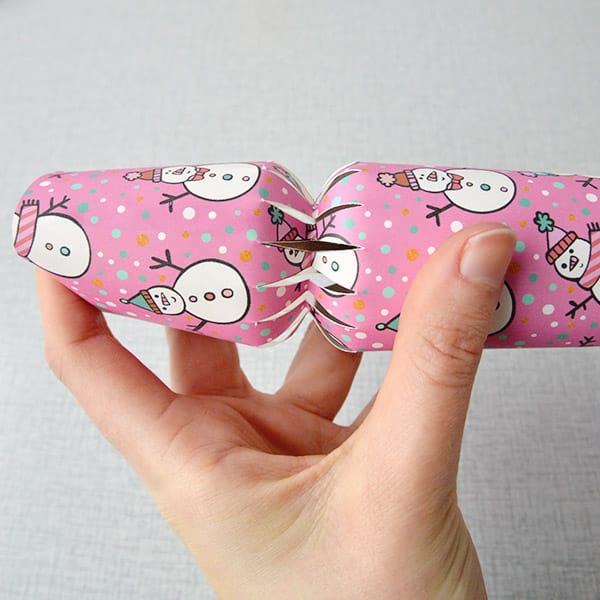
Doe nu voordat je de andere kant van de Cracker dichtmaakt de vulling erin. Een spreuk, je wasknijper met illustratie en wat confetti. Ik deed er ook nog een vrolijk chocolaatje bij, maar dat hoeft niet. Kijk wat je hebt liggen en maak er een klein feestje van.
Then fill your cracker with the good stuff; a motto, a clothespin and some confetti and/or gift or candy.
Maak vervolgens ook de andere kant van de cracker dicht door ook daar het gestanste randje naar binnen te vouwen en de cracker dicht te knopen met een touwtje of stukje lint. Plak ook hier de ‘kopse kant’ van de cracker even dicht met een stukje restpapier als je confetti gebruikt.
Then close the other side of the cracker in the same way as you closed the first one. Don’t forget to add another piece of scrap paper when using confetti!
Ready? Set? Bang!
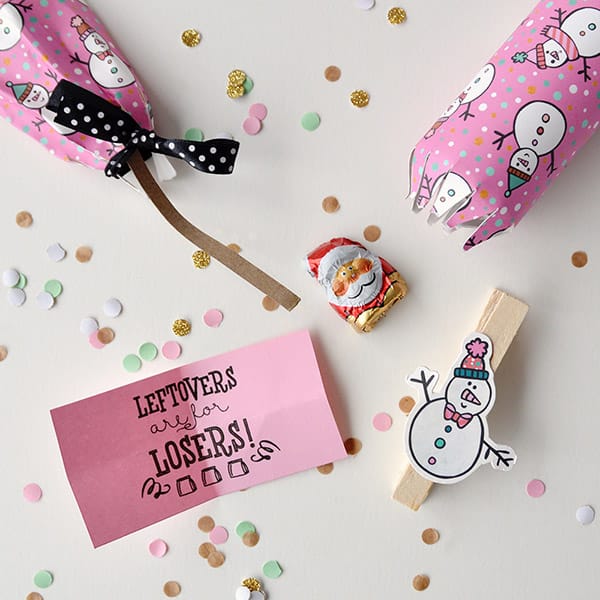
Dat was hem dan jongens; de manier om de allerleukste Christmas Crackers lekker zelf te maken. Leuk voor in de kerstvakantie!
Heb jij ook altijd Christmas Crackers op tafel? En ga je deze DIY proberen? Laat het me weten in de comments.
That’s it guys, the guide to making the awesomest Christmas Crackers yourself this year. You can add special small gifts to make the crackers extra personal.
Will you be trying this DIY? Let me know in the comments!

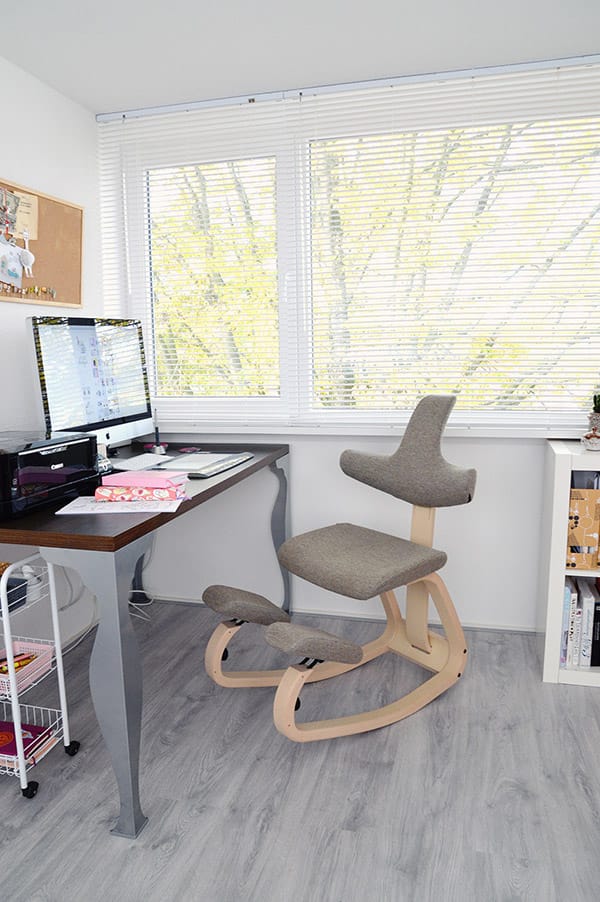
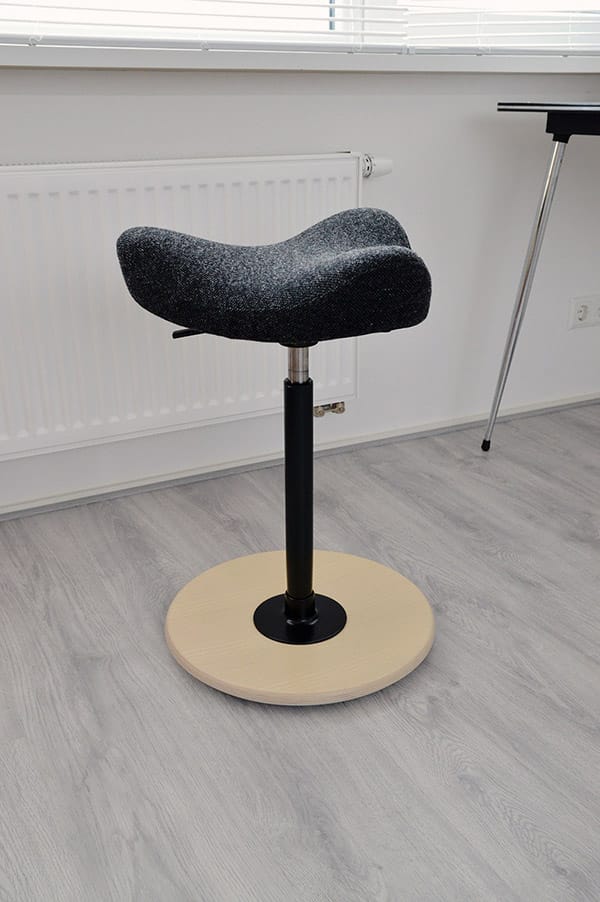
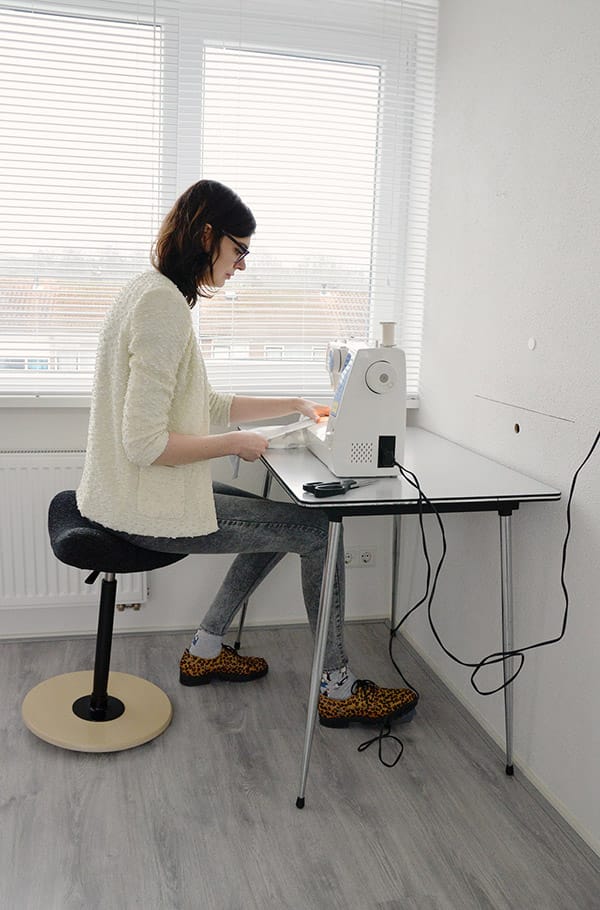
 ‘Goed zitten.’ Je leest er overal over en het is typisch zo’n onderwerp waarbij je heel snel door de bomen het bos niet meer ziet. Voor mij was dat niet anders toen ik ruim anderhalf jaar geleden rugklachten kreeg. Ik zat, nee ik hing, uren achter elkaar op een ‘normale’ bureaustoel. Het was een prima stoel die mijn vader ooit van zijn werk had meegenomen en toen ik op mezelf ging wonen kreeg ik die weer van hem. Die stoel was er gewoon en pas toen ik klachten kreeg ging ik nadenken of ik eigenlijk wel ‘goed zat’. Nee dus. Er waren momenten dat ik na lang zitten moeite had met lopen omdat de spieren in mijn rug zo stijf waren geworden en mijn schouders brandden constant. Ik ging dus op zoek naar een nieuwe stoel, maar voor mij was belangrijk dat de stoel ‘anders’ was dan de stoel waar ik al zo lang op zat. Als ik immers weer een ‘normale’ bureaustoel zou aanschaffen dan zag ik niet in waarom de pijn daarmee minder zou worden.